Corrections
Color grading starts in this section. When only light correction is required to enhance an image or match two shots, Corrections changes may be the only adjustments required.
Exposure
The Exposure slider adjusts the brightness of an image. Move the slider to the right to increase brightness and left to darken the image. The numeric values for the slider are calibrated in camera F-stops. Increasing the Exposure value by 1 is the equivalent to increasing the camera setting by one F-stop.
Contrast
The Contrast slider adjusts the luminance range of the image. Move the slider to the right to increase Contrast, which will result in a “punchier” image. Move the slider to the left to “flatten” the appearance of the image.
Pivot
The Pivot slider controls the midpoint of the image as it transitions from dark to light and works in tandem with the Contrast control. Therefore, the slider will have no effect until Contrast has been adjusted. Moving the Pivot slider to the right shifts that midpoint down. This effectively “stretches” the detail in the brighter portion of the image and darkens or “crushes” shadow detail. Move the slider to the left to shift that midpoint upward, which “compresses” the brighter regions, but opens up more detail in the darker, shadow regions of the image. The Pivot slider enables you to shift emphasis between the lighter or darker portions of the image, depending on which detail you want the viewer to see.
White Balance may be adjusted automatically, by color picker, or manually with Temperature and Tint sliders.
White Balance
Auto White Balance
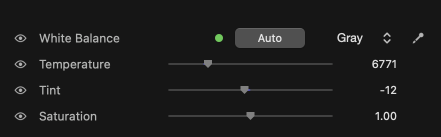
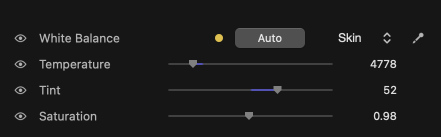
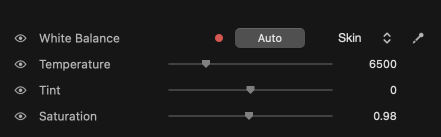
Click the Auto button and Color Finale 2 will balance the image automatically. The auto white balance engine analyses the image and finds the most reliable cues for neutral color, falling back to a secondary method when the scene is unusually colorful or lacks neutral content. A confidence indicator (colored dot next to the Auto button) shows how reliable the result is: green for high confidence, yellow for medium, and red for low confidence or a rejected result.
| High confidence | Medium confidence | Low confidence / rejected |
|---|---|---|
 |  |  |
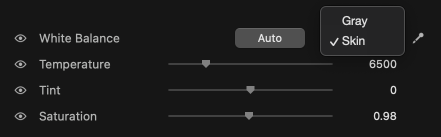
Picker Modes
Use the color picker icon and move the mouse to the viewer. A floating read-out of RGB values will appear. Find the area within the image that you would like to use to determine the balance and click the mouse. Color Finale 2 will then calculate white balance based on your selection.
The WB Mode selector lets you choose between two picker modes:
- Gray — the default mode. Pick a neutral (gray or white) area in the image. Color Finale calculates the correction to make the selected area neutral.
- Skin — pick a skin tone in the image. Color Finale calculates a correction that produces natural, flattering skin tones, anchored to reference skin colors. This mode is ideal for portrait and interview footage.
Picker samples are validated before they are applied. If you pick an area that is too dark, too bright, or too saturated, the sample will be rejected and you will hear an audible notification.
WB Bypass
The bypass button (eye icon) next to the White Balance section toggles the entire white balance correction (Temperature and Tint together) on and off with one click.
Manual Adjustment
To manually adjust White Balance, use the Temperature and Tint sliders.
Adjusting the Temperature slider changes the Kelvin value of the image (range: 2,000–23,000K). Slide to the right to make the color temperature of the image “warmer” and left to make it “cooler.” If you view a color test pattern on the waveform display set to RGB parade, then you’ll see what is actually happening. Adjusting the slider to the right will increase red and some green, but change very little in the blue. When you adjust the Temperature slider to the left, the opposite occurs. The main increase is in the blue, some in the green, and no change to the red.
Adjusting the Tint slider will change the value of only the green component of the image. Move the slider to the right to increase green, thus tinting the image with a green color cast. Move the slider to the left to decrease green, which tints the image with a magenta color cast.
The Saturation slider controls the overall amount of chrominance or color saturation. The default value is 1 at the midpoint of the slider, which means no change is being applied to the saturation values. Move the slider to the right to increase chrominance amplitude up to a value of 2, which is approximately 150% of the original amount of chroma. Move the Saturation to the left to decrease the chrominance down to a value of 0, which turns the image black-and-white.
The final slider in this section is Sharpness. This slider affects the high frequency portions of the image, making image detail appear sharper (slider to the right) or softer (slider to the left). The amount of change is a subtle enhancement and should not be used when an extreme change, like image blurring, is required.
Copy and Paste
Copy and Paste buttons at the bottom of the Corrections section enable the user to copy th Color Finale 2 adjustments made to a clip and paste them to any other instance o Color Finale 2. The Paste button is a pulldown selector with Paste and Paste Special options. The Paste selection will apply all copied values. Paste Special pops up a menu to pick which copied settings to apply, when only some and not all are to be applied.